Hello everyone! Welcome to part 2 of 'The Definitive Guide' on running Strapi, the headless open-source content management system, on Google Cloud Platform. I'm a Google Developer Expert in Google Cloud Platform. Be sure to check out Part 1 where we set up our Google Cloud environment. Now, in Part 2, we're going to dive into configuring the Strapi application itself for Google Cloud. We'll cover everything from setting up the Strapi application to securing it, connecting it to Google Cloud SQL, and managing media files with Google Cloud Storage. In case you missed it, here's the diagram of what we are building:

So let's get started!
TL;DR Watch the video:
Prerequisites
Node.js v.18+ installed locally.
Have Part 1 completed to deploy Strapi.
The gcloud command line interface installed on your machine
Creating a local Strapi project
Creating a Strapi project is simple, using your preferred terminal, in my case I use iTerm, go to the folder you want the Strapi project to be initialized, and there, you will run
npx create-strapi-app@latest appsmith
This command uses npx, which is a way to install Node.js dependencies and execute npm package binaries. This takes care of setting up our project which we named appsmith . After it installs all the dependencies, it will ask us what type of project we want to create.
npx: installed 101 in 10.48s
? Choose your installation type
❯ Quickstart (recommended)
  Custom (manual settings)
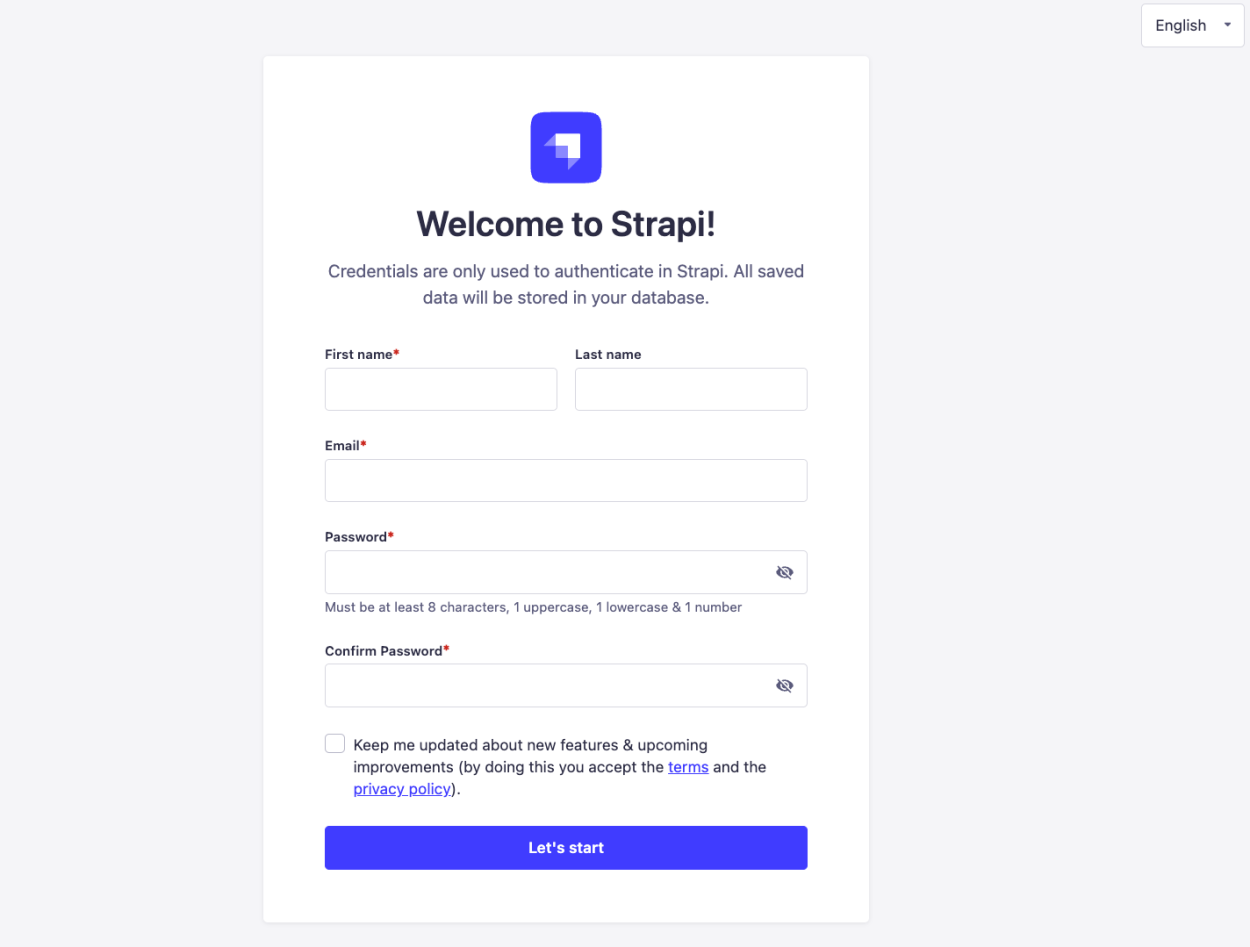
We will choose the Quickstart option which is best for most of the projects. Once this is done, our Strapi CMS app will be ready and we will see on the terminal that the server is running on http://localhost:1337/admin, open it on your browser and you should see something like this:

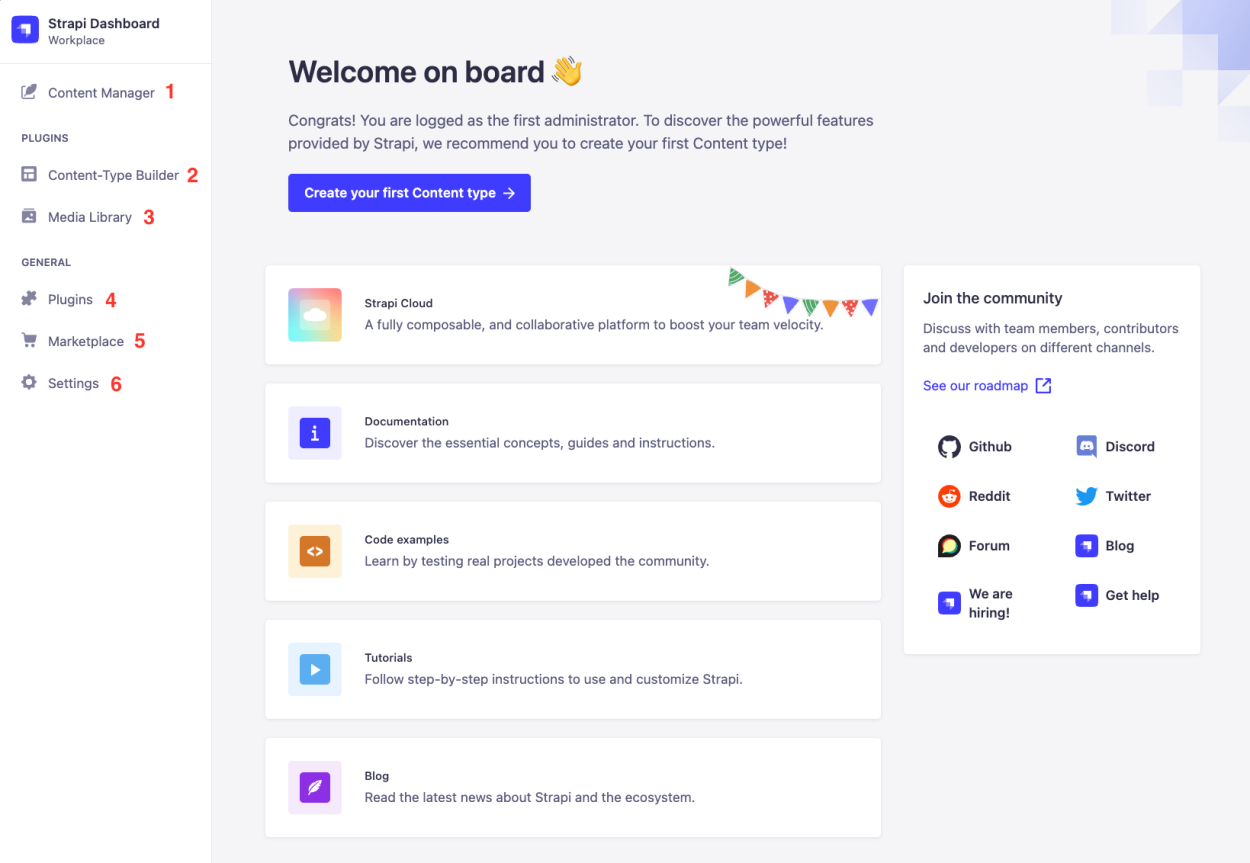
Here you will enter the details for the first and super admin user. After you enter your information, you will land on the Strapi dashboard, which is very straightforward.

Content Manager: Here you will see all the content on your CMS, divided by content type with filtering, search, sorting, etc.
Content-Type Builder: Here you visually create your different data models, fields, relationships, and behavior. Most of the application building is done here and Strapi translates everything to code, which you can also edit or write code if you desire to define models, controllers, policies, etc.
Media Library: Here you can see all media uploaded to the CMS, and group media in folders and categories very easily.
Plugins: Here you will see the currently installed plugins on Strapi.
Marketplace: Here you will see all the available plugins to install in your Strapi project.
Settings: Here are all the project settings like Roles, Permissions, Users, Internationalization**,** Emails, API Tokens, Providers, Webhooks and much more.
Now we are ready to start creating all the content types for our application or deploy it to Google Cloud, before that let's review some important Strapi commands to take into consideration:
  npm run build
  Build Strapi admin panel.

  npm run develop
  Start Strapi in watch mode.

  npm run start
  Start Strapi without watch mode.
So npm run build is a command to build Stapi, this one is important to run before running the develop one so all the configuration and changes are applied, for example, if you install new plugins or change the configuration files, make sure to run the build command.
Install required Strapi packages
Now that we have a working Strapi project, to run it in GCP we need to install 2 packages, one for the PostgreSQL connection, and one for the Cloud Storage provider. Locally and by default, Strapi comes with a basic SQLite database and stores the files in the same folder, so to run it on App Engine (serverless) we need to detach this.
Database Connection Configuration
Install the PostgreSQL package by running sudo npm install pg --save and now, create a folder under the config folder named env and inside of it created another folder named production here, we will put the configuration of our production environment like database connection, plugins config, etc. If you want to name your environment something different like stage or test that's ok, just created a folder with that name.
Now inside that folder create a file called database.js (config/env/production/database.js) and put the following content:
module.exports = ({ env }) => ({
    connection: {
      client: "postgres",
      connection: {
        host: `/cloudsql/${env("INSTANCE_CONNECTION_NAME")}`,
        database: env("DATABASE_NAME"),
        user: env("DATABASE_USER"),
        password: env("DATABASE_PASSWORD"),
      },
    },
 });
This will have our connection string using environment variables, we will configure these environment variables in the next steps.
Cloud Storage Connection Configuration
Install the Strapi Cloud Storage provider package by running sudo npm install @strapi-community/strapi-provider-upload-google-cloud-storage --save and create a file in the same environment folder we created in the previous step called plugins.js (config/env/production/plugins.js) (read more about this package here)
module.exports = ({ env }) => ({
    upload: {
      config: {
        provider: '@strapi-community/strapi-provider-upload-google-cloud-storage',
        providerOptions: {
          bucketName: env('GCS_BUCKET_NAME'),
          basePath: env('GCS_BASE_PATH'),
          publicFiles: true,
          uniform: false,
        },
      },
    },
});
Important note here: If your Cloud Bucket is set to use uniform Object Access Control, then changeuniform: true. Also, if you do not have the files publicly accessible, then setup publicFiles: false.
Lastly. we have to set up the strapi::security middleware to avoid CSP-blocked URLs. Edit ./config/middlewares.js and make sure to edit the strapi::security line with an object that looks like this:
module.exports = [
  'strapi::errors',
  {
    name: 'strapi::security',
    config: {
      contentSecurityPolicy: {
        useDefaults: true,
        directives: {
          'connect-src': ["'self'", 'https:'],
          'img-src': ["'self'", 'data:', 'blob:', 'storage.googleapis.com'],
          'media-src': ["'self'", 'data:', 'blob:', 'storage.googleapis.com'],
          upgradeInsecureRequests: null,
        },
      },
    },
  },
  'strapi::cors',
  'strapi::poweredBy',
  'strapi::logger',
  'strapi::query',
  'strapi::body',
  'strapi::favicon',
  'strapi::public',
];
What this does in short words, is allowing Strapi to preview the images that are uploaded to Cloud Storage.
App Engine Configuration
Now that our app has the necessary packages and configuration files, let's create the App Engine configuration file which will define how our Strapi CMS will run. Let's create a file called app.yamlin the root of the Strapi project which is what App Engine reads to run the app.
Before we do that, go to the Cloud SQL instance we created in Part 1 by visiting https://console.cloud.google.com/sql/instances on the instance dashboard you will see the connection name, you will need this to put on the app.yaml, normally the structure is project_name:region:instance_name in my case appsmith-403817:us-central1:appsmith

Now with that connection name copied, create the app.yaml file and enter your credentials
runtime: nodejs18
instance_class: F2

env_variables:
  HOST: '0.0.0.0'
  NODE_ENV: 'production'
  DATABASE_NAME: 'postgres'
  DATABASE_USER: 'postgres'
  DATABASE_PASSWORD: 'CLOUD_SQL_PASSWORD'
  INSTANCE_CONNECTION_NAME: 'CLOUD_SQL_CONNECTION_NAME'
  GCS_BUCKET_NAME: 'CLOUD_STORAGE_BUCKET_NAME'
  GCS_BASE_PATH: 'cms'

beta_settings:
  cloud_sql_instances: 'CLOUD_SQL_CONNECTION_NAME'
runtime: This is the version of the Node.js image we want to use,
nodejs18is recommended.instance_class: The instance class defines the CPU/Memory configuration of the instance, read more about all the instance classes here (F2 is a basic 768MB memory and 1.2 GH CPU). For production I recommend B8.
NODE_ENV:
production(if you defined another environment folder in the previous step then use that name instead of production)DATABASE_NAME:
postgres(this is the default database that CloudSQL creates when you provision a new instance)DATABASE_USER: 'postgres' (this is the default user that CloudSQL creates when you provision a new instance)
DATABASE_PASSWORD: replace
CLOUD_SQL_PASSWORDwith the password you created in Part 1.INSTANCE_CONNECTION_NAME: Replace
CLOUD_SQL_CONNECTION_NAMEwith the connection name you copied from Cloud SQL in the previous step.GCS_BUCKET_NAME: Replace
CLOUD_STORAGE_BUCKET_NAMEwith the name of the bucket we created in Part 1.GCS_BASE_PATH: This will be the prefix for your bucket URL files, you can define the one you prefer.
Google Cloud Build Command
Now that we have the configuration file in place that tells App Engine how to run Strapi, we need to configure the build command that GCP will run when we deploy the app, this is really simple, just locate the package.json file and edit the scripts object and add a new line for "gcp-build": "strapi build", so it will look something similar to this:
"scripts": {
    "develop": "strapi develop",
    "start": "strapi start",
    "build": "strapi build",
    "strapi": "strapi",
    "gcp-build": "strapi build"
},
Last, let's add a new file in the root of the project called .gcloudignore which tells Google what files or folders to ignore when deploying, similar to the .gitignore, to avoid pushing the node_modules folder and other non-necessary files.
.gcloudignore
.git
.gitignore
node_modules/
#!include:.gitignore
!.env
yarn.lock  # If you're using Yarn
Deploy to App Engine!
After all of this hard work, we are now ready to deploy our application to Google Cloud's App Engine! The way we do this is simple, in the root of the application folder, using your terminal with the gcloud run:
gcloud app deploy app.yaml --project PROJECT_NAME
Replace PROJECT_NAME with your project's name, in my case, is appsmith-403817 , you will see something like this:
descriptor:                  [/Users/kevin/PROJECTS/strapi-googlecloud/app.yaml]
source:                      [/Users/kevin/PROJECTS/strapi-googlecloud]
target project:              [appsmith-403817]
target service:              [default]
target version:              [20231109t220246]
target url:                  [https://appsmith-403817.uc.r.appspot.com]
target service account:      [App Engine default service account]


Do you want to continue (Y/n)?  y

Beginning deployment of service [default]...
╔════════════════════════════════════════════════════════════╗
╠═ Uploading 34 files to Google Cloud Storage               ═╣
╚════════════════════════════════════════════════════════════╝
File upload done.
Updating service [default]...done.
Setting traffic split for service [default]...done.
Deployed service [default] to [https://appsmith-403817.uc.r.appspot.com]

You can stream logs from the command line by running:
  $ gcloud app logs tail -s default

To view your application in the web browser run:
  $ gcloud app browse --project=appsmith-403817
CONGRATS!
Now you are ready to visit the Strapi instance by going to the URL mentioned on the console, in my case is https://appsmith-403817.uc.r.appspot.com/admin/.
You can review my codebase as a reference, it's publicly available here: https://github.com/kevinblanco/strapi-googlecloud
You are now ready for Part 3, where we are going to setup automated deployment builds using Google Cloud Build!

