Hello everyone! Welcome to 'The Definitive Guide' on running Strapi, the headless open-source content management system, on Google Cloud Platform. I'm a Google Developer Expert in Google Cloud Platform. Today, I'm going to guide you through the entire process of deploying Strapi on GCP using Google App Engine, Google Cloud SQL, Google Cloud Storage with continuous integration/delivery using Google Cloud Build, from zero to production.
TL;DR Watch the following video:
If you, like me, have struggled with incomplete documentation on achieving this, don't worry. This series aims to provide you with a comprehensive step-by-step guide, sharing insights and best practices based on my real-world experience as a Certified Google Cloud Architect and Google Developer Expert running more than five production Strapi workloads in GCP for big customers. First, let's review a diagram of what we are going to be building:

Cloud App Engine
Zero server management service that will run our Strapi Headless CMS. We will use the Node runtime from App Engine Standard.
Cloud SQL
We will leverage this serverless database service running PostgreSQL to effortlessly scale to meet any demand, with no maintenance for accelerated development with built-in live synchronization, offline mode, daily backups, multiple zones availability and Point-in-time recovery from Slave.
Cloud Storage
All assets uploaded to the CMS such as files, images and videos will be saved in Cloud Storage for reliable and secure object storage. Also, these files might be securely served in any “frontend” layer using AIM policies and ACL for object storage.
Cloud Stackdriver, Monitor and Error Trace
To follow the standard SRE principles and control the four golden signals of monitoring (latency, traffic, errors, and saturation) we will use Strackdriver to pull information from all of these services and drive these to Cloud Monitoring where we will have dashboards for each of these values, alerts to let key technical members know of any anomaly, Cloud Logging to track and view all logs generated by these services and finally Cloud Trace to trace errors across the different application layers and services.
Cloud Build
We'll use Cloud Build for delivery pipelines, continuous integration and automated code checks.
Prerequisites
A Google Cloud Platform Account with billing enabled or a free trial $300 credit.
The gcloud command line interface installed on your machine
This first part is all about setting up for success, we'll go over enabling and creating the necessary APIs, Permissions, Services and Products needed for this to run as it should.
APIs & Permissions
To run Strapi in GCP, a set of APIs has to be enabled so that the different services can connect to each other:
Now, if you don't want to go one by one enabling them on the browser, you can enable them using the gcloud CLI or the Cloud Shell in GCP running each of these commands separately or in a single command separated by commas.
gcloud services enable secretmanager.googleapis.com
gcloud services enable cloudbuild.googleapis.com
gcloud services enable sqladmin.googleapis.com
gcloud services enable compute.googleapis.com
gcloud services enable logging.googleapis.com
gcloud services enable appengine.googleapis.com
gcloud services enable iam.googleapis.com
gcloud services enable appengine.googleapis.com
Now, let's initiate our App Engine service so we can configure its service account permissions. App Engine is the serverless service we will use to deploy Strapi to the Cloud
You can do this manually by searching for "App Engine" in the search box at the top and initiating the app in the region of your choice, but remember, this regionis key since most of the services we'll use should be in the same region, also, select the default App Engine service account.
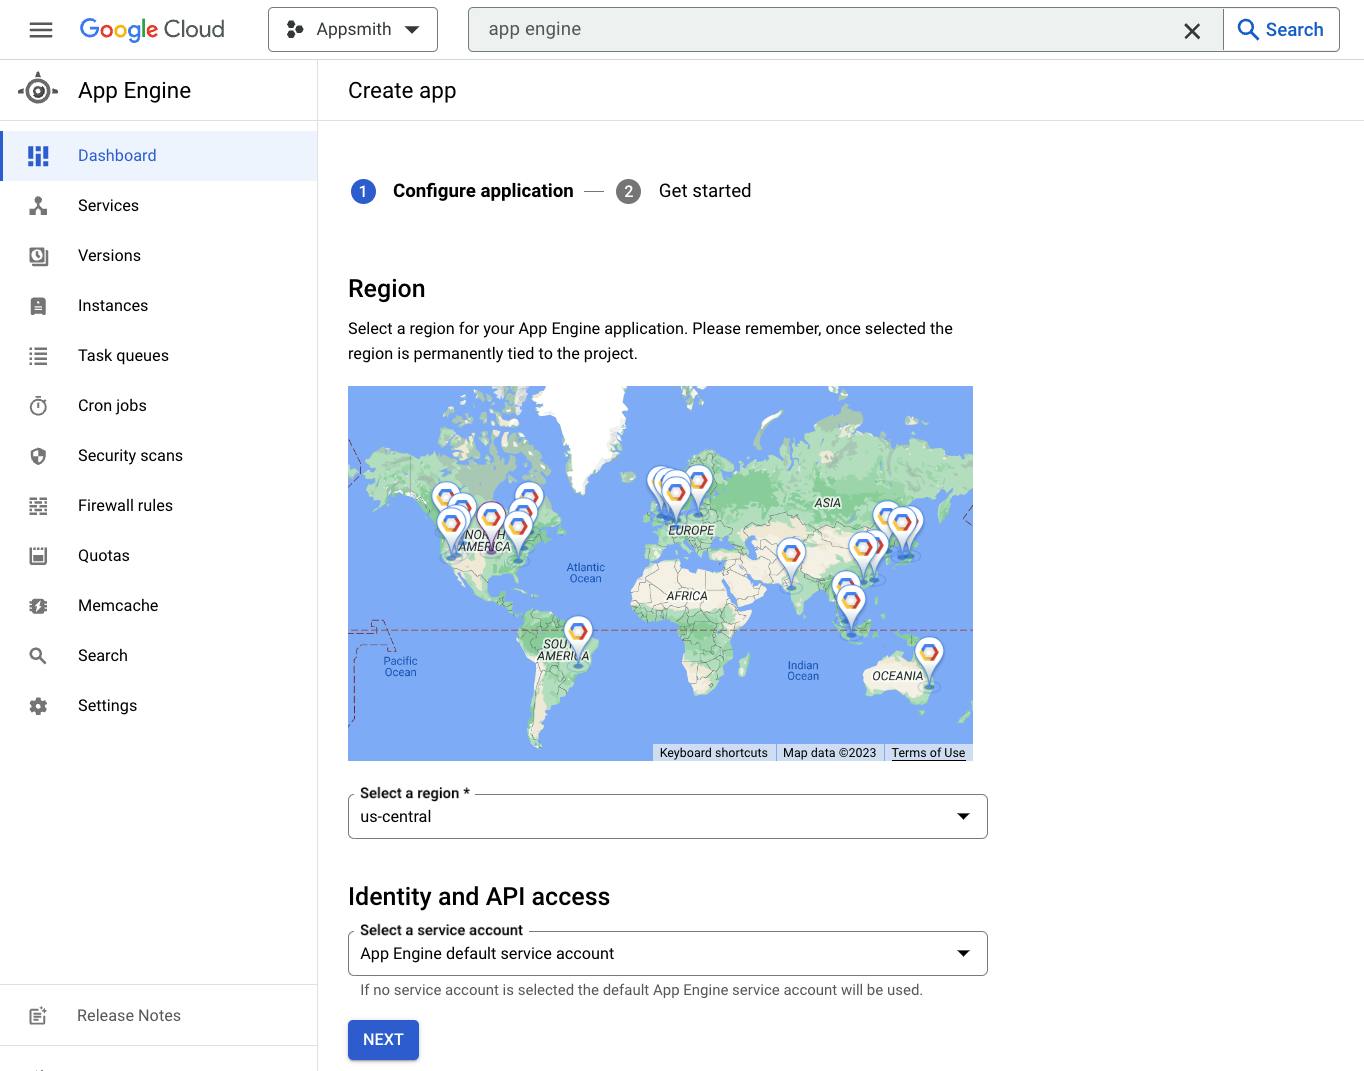
You can also easily do this with gcloud by running the following command (you can again, pass the region of your choice as a parameter, for this demo we'll use us-central):
gcloud app create --region=us-central
Now that App Engine is initiated, we can give its service account the permissions it needs to connect to the APIs and Services that Strapi will need to connect. go to AIM - Under service accounts and find the service account for App Engine, normally the name is app-name@appspot.gserviceaccount.com for example, in my case is appsmith-403817@appspot.gserviceaccount.com, you can also find the right service account by running
gcloud app describe
This will tell you the service account associated with your app. Now, edit this service account and add the following permissions
Cloud SQL Client
Cloud SQL Editor
Storage Object Admin
App Engine Deployer
Logging Admin
You can also do this easily with the gcloud CLI using the gcloud projects add-iam-policy-binding command. Here's the structure of the command:
gcloud projects add-iam-policy-binding YOUR_PROJECT_ID \
  --member=serviceAccount:SERVICE_ACCOUNT \
  --role=ROLE
So to allow these permissions we would run:
gcloud projects add-iam-policy-binding YOUR_PROJECT_ID \
  --member=serviceAccount:appsmith-403817@appspot.gserviceaccount.com \
  --role=roles/cloudsql.client

gcloud projects add-iam-policy-binding YOUR_PROJECT_ID \
  --member=serviceAccount:appsmith-403817@appspot.gserviceaccount.com \
  --role=roles/cloudsql.editor

gcloud projects add-iam-policy-binding YOUR_PROJECT_ID \
  --member=serviceAccount:appsmith-403817@appspot.gserviceaccount.com
  --role=roles/storage.objectAdmin

gcloud projects add-iam-policy-binding YOUR_PROJECT_ID \
  --member=serviceAccount:appsmith-403817@appspot.gserviceaccount.com \
  --role=roles/appengine.deployer

gcloud projects add-iam-policy-binding YOUR_PROJECT_ID \
  --member=serviceAccount:appsmith-403817@appspot.gserviceaccount.com \
  --role=roles/logging.admin
Replace YOUR_PROJECT_ID with your actual Google Cloud project ID. These commands will add the specified roles to the appsmith-403817@appspot.gserviceaccount.com service account in the project. Now, we are ready to create the database.
Create a Database
To run Strapi you will need a database to store the data, Strapi supports multiple databases and in my experience, the best in the context of GCP is to use Cloud SQL.
Go to Cloud SQL (https://console.cloud.google.com/sql/instances) and Create a New Instance, then select "PosteSQL" and on the next screen, you will define the instance characteristics
Instance Name: The name of your choice, lowercase no spaces or special characters, in my case the name will be
strapiPassword: Define the default admin user "postgres" password. I recommend using the generator to create a strong password and store it since you will need it.
Database Version: PostgreSQL 15 (14 tested to work fine as well)
Cloud SQL Edition: Here it depends on your system availability requirements, for production I recommend Enterprise Plus, but for development Enterprise is fine
Preset: Again, if it's production choose "Production", if it's development "Development" or "Sandbox" will work. I will choose Sandbox to avoid high costs.
Region: Select the same region as the one you choose for the App Engine app, in my case us-central1.
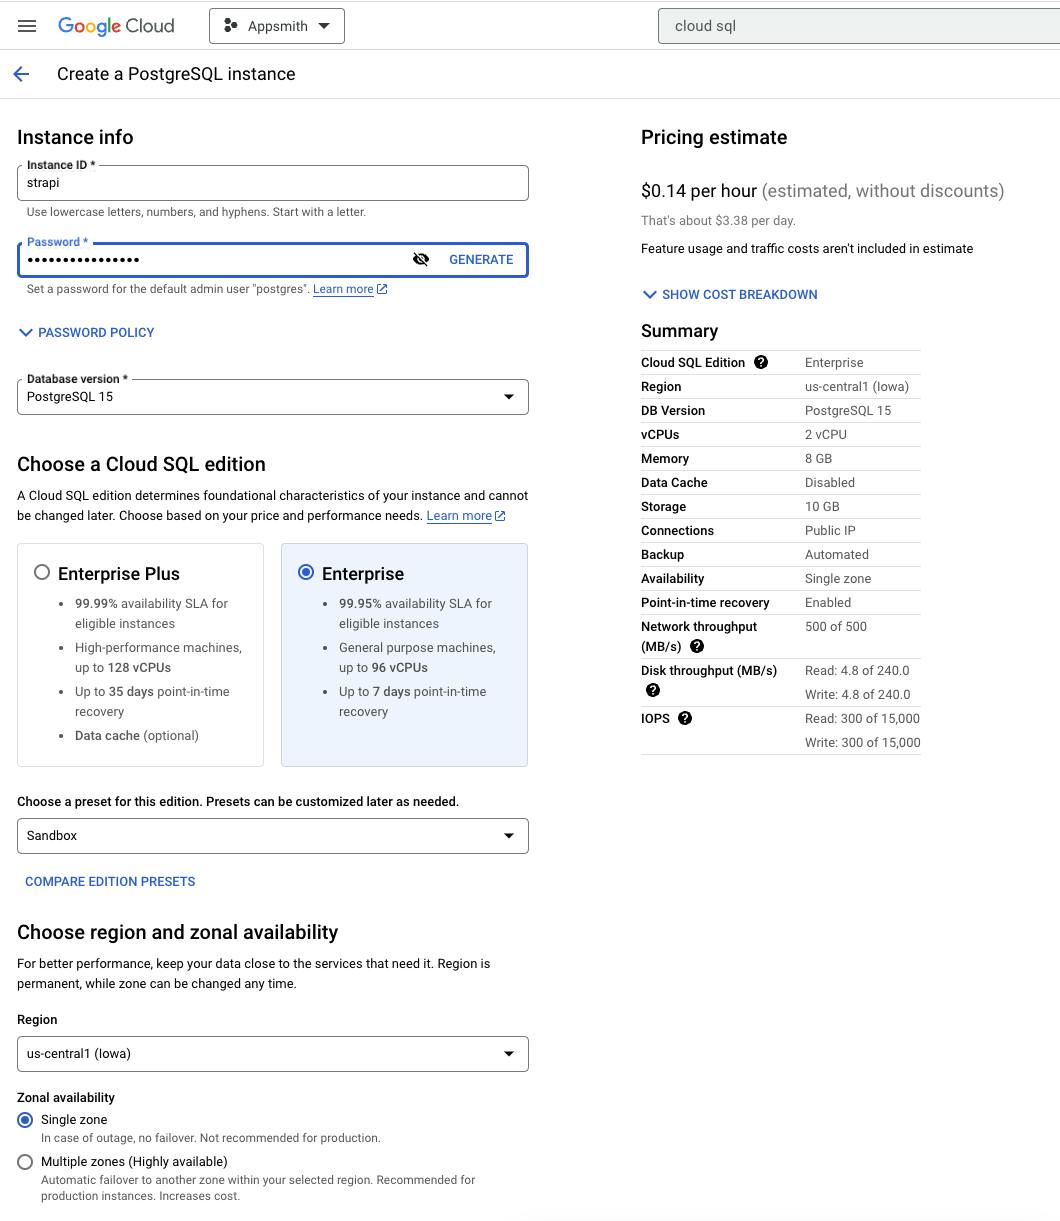
You can also do this using the gcloud CLI:
gcloud sql instances create INSTANCE_NAME \
  --database-version=POSTGRESQL_15 \
  --tier=db-custom-2-8192 \
  --region=us-central1 \
  --availability-type=zonal \
  --storage-type=SSD \
  --storage-size=10GB \
  --network-throughput=500MB \
  --maintenance-window-day=1 \
  --maintenance-window-hour=2 \
  --backup-start-time=02:00 \
  --activation-policy=ALWAYS \
  --location-preference=us-central1 \
  --failover-replica-name=INSTANCE_NAME-replica \
  --root-password=YOUR_PASSWORD
Replace the following placeholders:
INSTANCE_NAME: Provide a name for your Cloud SQL instance.YOUR_PASSWORD: Replace this with the desired password for the root user.
Last, now that we have a database, we need to give the service account permissions to access that Database, since Strapi will use the App Engine service account to read/write to the DB. You can easily do this by running:
gcloud projects add-iam-policy-binding PROJECT_ID \
    --member=serviceAccount:SERVICE_ACCOUNT \
    --role=roles/cloudsql.editor
In my case it's
gcloud projects add-iam-policy-binding appsmith-403817 \
    --member=serviceAccount:appsmith-403817@appspot.gserviceaccount.com \
    --role=roles/cloudsql.editor
Create a Cloud Storage Bucket
For Strapi CMS to store and retrieve assets such as images, videos and files we need to set up a Cloud Storage bucket, so go to https://console.cloud.google.com/storage and click "Create" to add a new bucket.
Name: The name of your choice, lowercase no spaces or special characters, in my case the name will be
strapi-cms-gcpLocation Type: For Production projects, I recommend Multi-region or Dual-region at least, for Development, a single region is fine, I'm selecting the same us-central1 as the Database and App Engine.
Storage Class: Select Standard, which is best for short-term storage and frequently accessed data.
Object Access Control: Here you define how the objects's access rules will be defined. Uniform: Ensure uniform access to all objects in the bucket by using only bucket-level permissions (IAM) or Fine-grained: Specify access to individual objects by using object-level permissions (ACLs) in addition to your bucket-level permissions (IAM). Strapi supports both, I will select Uniform.
Object Protection Policy: Here you can control how object deletion works, you can define object versioning or a retention policy by minutes, hours, days, etc. For the sake of a development environment, I will select "None" but for Production, I recommend a Retention Policy to comply with data practices.
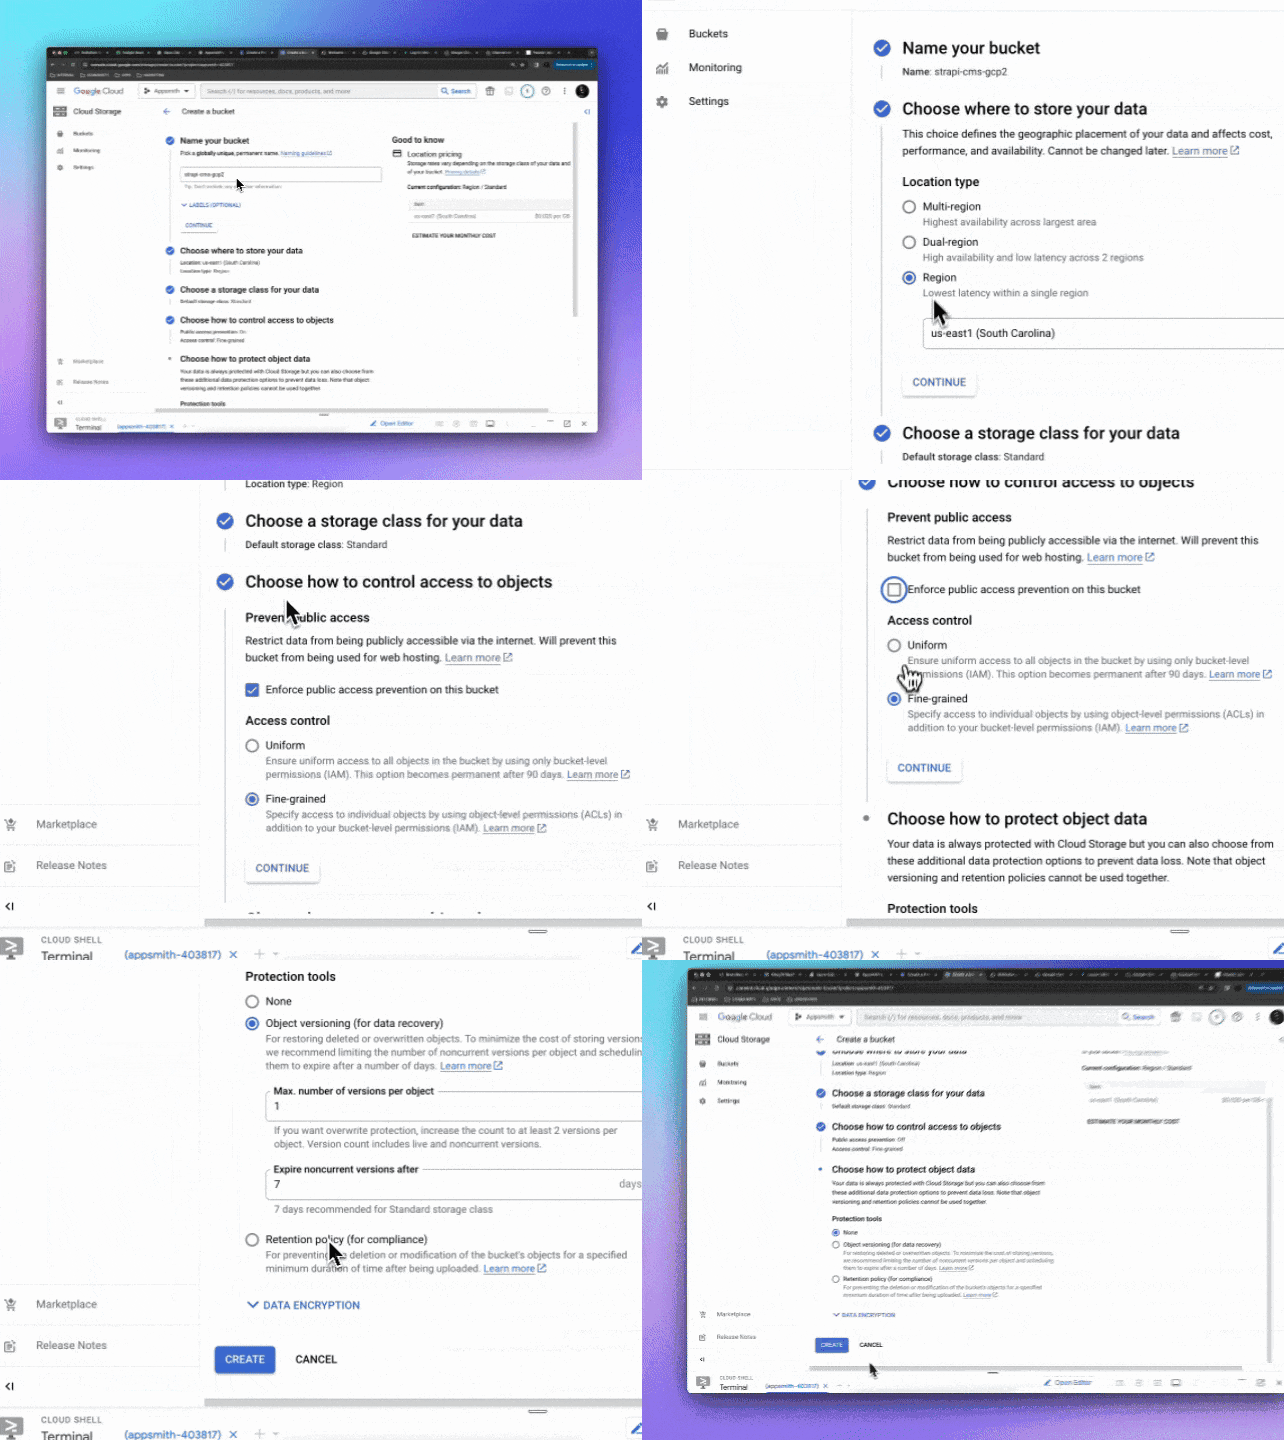
You can also do this easily by using the gsutil CLI which is part of gcloud running the following 2 commands
gsutil mb -p PROJECT_ID -l us-central1 gs://strapi-cms-gcp
gsutil uniformbucketlevelaccess set on gs://strapi-cms-gcp
Replace PROJECT_ID with your project ID and strapi-cms-gcp with your desired bucket name.
OPTIONAL: If your case is to use Strapi as a CMS to be accessible from the internet you will want the assets to have a public URL from the bucket, to do this you can run:
To grant public read access to a Google Cloud Storage bucket and its files for allUsers, you can use the gsutil tool with the acl ch command. Here's how to do it:
gsutil acl ch -u AllUsers:R gs://strapi-cms-gcp
This command grants read (R) permission to allUsers, which effectively makes the files in the bucket publicly accessible. Users can access and download objects in the bucket without authentication.
Last but not least, you want to give the App Engine service account permissions to write/read this bucket, because Strapi will use the service account credentials to write and read the files on the bucket, to do that, you can go to the bucket's permissions tab by adding a New Principal and give the "Object Storage Creator" and "Object Storage Viewer"
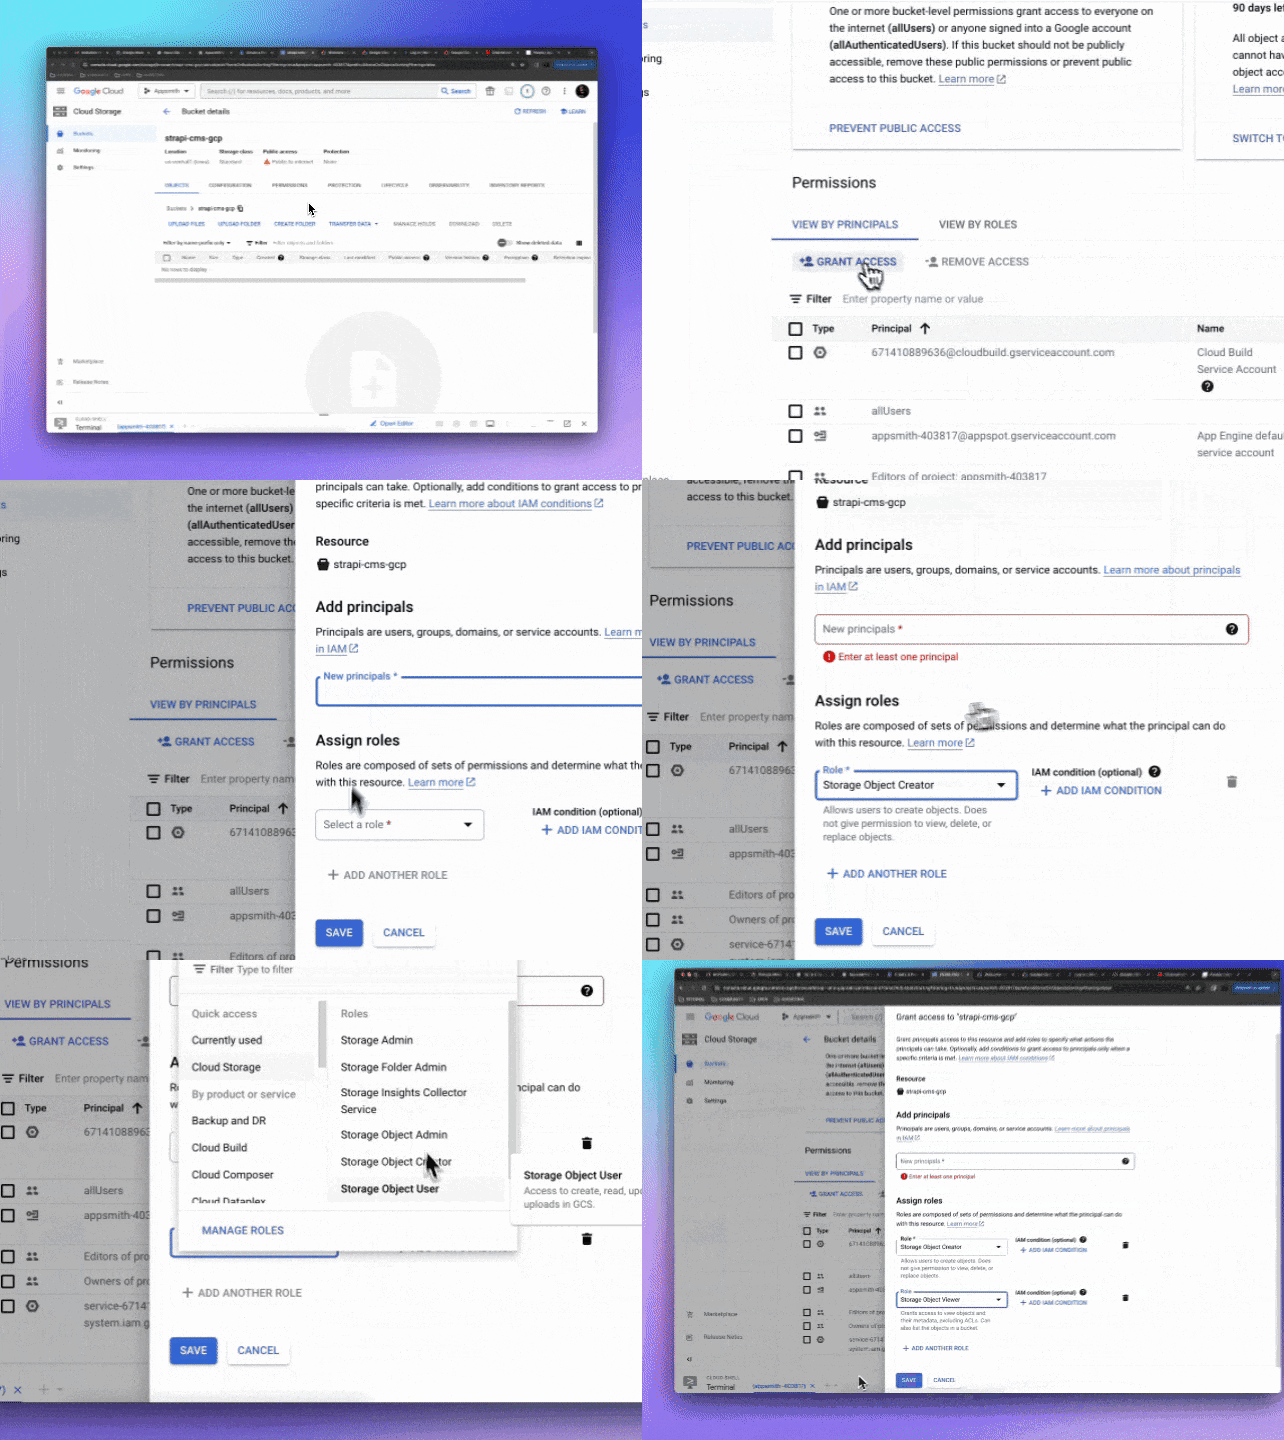
You can also do that by using the CLI by running:
gcloud storage buckets add-iam-policy-binding gs://YOUR_BUCKET \
    --member=serviceAccount:YOUR_SERVICE_ACCOUNT \
    --role=roles/storage.objectAdmin

gcloud storage buckets add-iam-policy-binding gs://YOUR_BUCKET \
    --member=serviceAccount:YOUR_SERVICE_ACCOUNT \
    --role=roles/storage.objectCreator
In my case, it will be
gcloud storage buckets add-iam-policy-binding gs://strapi-cms-gcp \
    --member=serviceAccount:appsmith-403817@appspot.gserviceaccount.com \
    --role=roles/storage.objectAdmin

gcloud storage buckets add-iam-policy-binding gs://strapi-cms-gcp \
    --member=serviceAccount:appsmith-403817@appspot.gserviceaccount.com \
    --role=roles/storage.objectCreator
With this, we are done with Part 1! We have our Database, Storage, App Engine Instance and all permissions needed, you are now ready to head to Part 2, where we build the Strapi CMS and then deploy it to the stack we just created!
Let me know if you have any questions or issues with any of the steps, keep it up!

